Coupler Leon Editor
Anleitung Editor Koppelmodul LEON
With the coupling module LEON further registers can be installed on an existing organ. Switches are connected to control the registers. Every assignment from manual to manual or to a register is programmable. The coupling functions:
N NORMAL
P SUPER COUPLE (1 octave)
U SUBCOUPLE (1 octave)
2P SUPERSUPER COUPLE (2 octaves)
2U SUBSUBCOUPLE (2 octaves)
Ci splitting into C Cis
NC splitting into C
NCi splitting into cis
PRIORITY Each priority button can be assigned a priority, selectable active on / off
thus, e.g. All reed pipes are switched ON / OFF with one switch.
ZUGMAGNET For each function, a slider action magnet can also be selected
Transpose + – 12HT
Registers up to 96 pipes are supported.
In order to make the settings, an editor with a display is installed in the module.
After starting the module runs in normal mode.
The editor has 6 function keys
a EDIT Start / End Editmode, after pressing the key you get to the editor
b OK executes the desired function
c Up Selection of the menu entry pointer upwards
d Down Selection of menu entry pointer down
e Left selection back
f Right selection next

By pressing the EDIT key one reaches the edit mode
Couple MENUE

Cursor on 3rd digit. By pressing the OK key you reach the register menu

Select step 05 with UP / DOWN, then select the desired input with the LEFT / RIGHT button.
You can connect 64 switches.
Nr05 function step, 99 function steps can be stored
The T002 shows the position of the switch in the bus system.
RM shows the action magnet 1-64
With the DOWN key you get to the coupling settings
Mit the LEFT / RIGHT UP / DOWN buttons can be used to set the desired coupling.
M1 = Manual 1, M2 = Manual 2, M3 = Manual 3, PE = Pedal
R1 = register 1, R2 = register 2, R3 = register 3, to R9, option RA
N = normal, P = super, U = subcoupling, 2P = 2xSuper, 2U = 2xSub, Ci splitting into C cis
NC splitting into C, NCi splitting into Cis
With the DOWN button you get to the priority circuit
The UP / DOWN keys can be used to set the priority key, active when ON / OFF
here: The key 007 has a function only if the key 003 is OFF, then
M2 is coupled to R2 as NORMAL.

The entry of a priority is optional. The entry of a action magnet is optional.
Move 7 semitones in register 4

Press the DOWN button to change to the Save line, then press the OK button and the message: Saved appears on the screen
so that the coupling is programmed.
Select Tutti, the RM63 activates the TUTTI

Select Crescendo, with the RM62 the crescendo is activated

MANUALMENUE
Move cursor to 2nd
By pressing the OK button you get to the submenu Manual set

Manual set:
Select Manual set with UP / DOWN then use the LEFT / RIGHT buttons to select the desired manual. (1-3 and Pedal)
Go to “Taste lesen”
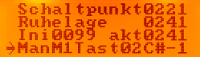
In the lower line the selected manual is displayed (1-3 and pedal) and with the keys LEFT / RIGHT the desired manual key is selected.
The display shows the zero position, the switching point and the current position of the key.
The zero position:
The value of the zerot position should be around 240. See installation instructions
The switching point:
The switching point is the value at which the manual key is switched.
Current:
This value indicates the current position of the manual key. If the key is pressed, then
the displayed value is smaller. If the value is smaller than the value of the switching point, the manual key is on.
init:
The Init value should be between 60 and 120, if it is below 60, the reflection surface is either too bright or the distance too low, over 120 too dark or too far away. Distance between sensor and reflection surface should be 6mm in the zero position.

By pressing the OK key you can enter the submenu Set switching point

Zero set:
Select Zero position set with UP / DOWN then OK key press, the rest position of the manual keys is saved. This should be done before executing the setpoint and switchpoint edit functions.
Press the OK button to get to the submenu Switch point edit

Select Init then press OK
Select switching point with UP / DOWN then set the desired value with the LEFT / RIGHT buttons. (1-64)
Buttons All:
Manual key selection – Select all or individually with the LEFT / RIGHT keys
Save: At switching point OK press key, the switching point is stored for the selected keys
SYSTEMMENUE

By pressing the OK button you get to the submenu system

Move cursor to tutti, set register combination, press OK
the selected combination is saved as tutti

Move cursor to Cresc, set register combination,
Set Crescendo step to the desired position, press OK
the selected combination is saved as a crescendo position

Move cursor to register switch, press OK
The registers are switched from pushbuttons/switches type

Saving the programming from SD card

Reading the programming from the SD card

Clearing the programming (final)